
Cypress and Angular
Best practices for E2E Tests with Cypress and Angular
In this article I will show a possible architecture in order to reuse much of the test code and how to minimize code changes and the maintenance effort during development by holding the test data and selectors externally.

Tooling:
- Cypress 4+
- Angular 9+, with matching TypeScript
- Chrome 80+
- Visual Studio Code
Prerequisites:
- Installed NodeJS
- Installed NodeJS
- Installed Angular CLI
- If you have a proxy, you need to configure the proxy for node, Cypress will download some executables after its installation.
- Cypress Setup in your Angular Project
The following chapter will represent this diagram/structure.
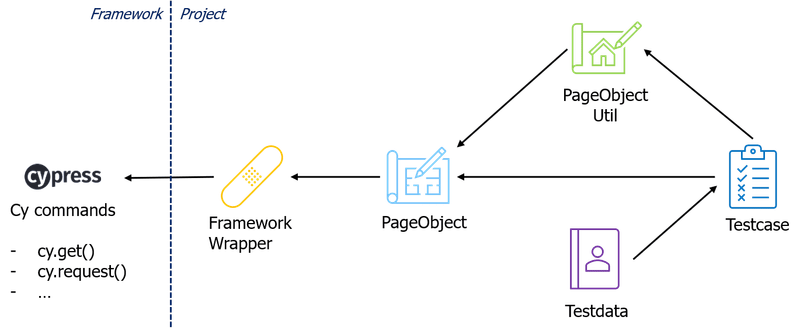
Structure your Tests
Folder Setup
In the following chapters we will go through each folder and fill the files with content.
At the end, you will get a folder structure like this:
cypress
├── fixtures
│   └── sample.spec.json
├── integration
│   └── sample.spec.ts
├── plugins  # installed & created automatically
│   ├── ...
├── support
│   ├── commands.ts
│   ├── index.js
│   ├── selectors
│   │   └── sample.selectors.ts
│   ├── po
│   │   └── sample.po.ts
│   ├── utils
│   │   └── sample.utils.ts
│   └── shared
│       └── common.ts
└── tsconfig.json
Framework Wrapper
We create a folder shared for all the common methods we can use multiple times over the complete application, i.e. openBrowser() or navigateToRoute(myRouteName).
It is also a good idea to wrap some methods from the framework here to add a central logging or other configuration
If you want to use your test code in multiple projects, you may have to write plugins or share it over npm packages.
In our case, based on the first article, the common.ts file would include the open method for the browser, the findAndClick method is moved into a PO file.
// support/shared/common.ts
export namespace Common {
    export function open(host: string = 'http://localhost', port: number = 4200) {
        cy.visit(`${host}:${port}`);
        // may do here your login or other stuff
    }

    // simple example for a wrapped Cypress command
    export function request(url: string, options) {
        cy.log(url);
        return cy.request(url, options);
    }
}
To complete this change, remove the findAndClick method in the commands.ts:
// support/commands.ts
import { Common } from './shared/common';

declare global {
    namespace Cypress {
        interface Chainable {
            /**
             * Open browser and navigate
             *
             * @param [host='http://localhost'] hostname where your app is running
             * @param [port=4200] number of port where your app is running
             */
            open(host?: string, port?: number): Chainable<Element>;
        }
    }
}

// collection of cy enabled methods
Cypress.Commands.add('open', Common.open);
Selectors
If you do not have many selectors you can skip this section and add the selectors directly to the Page Objects.
To have the best possible separation I recommend to save the selectors in it's own structure.
// support/selectors/sample.selectors.ts
export namespace SampleSelectors {
    export const TERMINAL = 'div.terminal';
    export const BUTTON_WRAPPER = '.card.card-small';
}
Note:
Because the Angular default app is missing better selectors we select the buttons by text. This is not a recommended behaviour.
Cypress has a great Best Practices Guide for Selecting Elements on their webpage.
I recommend to usenameattributes to select input fields anddata-*attributes to select buttons and every other element which has a not unique name.
Page Objects
Because our default generated Angular app has only one page we create a sample.po.ts under the po folder and prefill it with our checkTextInTerminal. These methods were used as a direct Cypress call in the base tutorial. Technically this is absolutely okay, but we may want to check the terminal text multiple times. That is why we wrap this line into a method with a text parameter.
// support/po/sample.po.ts
export namespace SamplePo {
    export function checkTextInTerminal(text: string) {
        cy.get(SampleSelectors.TERMINAL).should('contain.text', text);
    }

    export function findButtonAndClick(buttonText: string) {
        cy.get(SampleSelectors.BUTTON_WRAPPER).contains(buttonText).click();
    }
}
The most important advantage of these PO files is, that you only have to change the selector constants when a selector is changing during development.
When more than just a selector is changing, maybe a whole feature, then you have to change the PO file. But in any case you do not have to change the testcase itself.
This separation of logic allows, for example, a tester to write the actual tests under the integration folder and the developer will implement the logic in the PO files.
Naming PO
We decided for the PO name because we had previously used Protractor and the component abstractions were kept in PO files.
Basically you can name these folders and files whatever you like; this is not defined by Cypress.
Page Object Utils
If you have many repeating steps in your tests (i.e. filling forms with many input fields) then you may want to simplify this calls.
As we do not have input fields in the generated project this is an example how this could look like.
// support/utils/sample.util.ts
export namespace SampleUtil {
    export function clickAllPossibleButtonsAndCheckTerminal() {
        findButtonAndClick('button1');
        checkTextInTerminal('text1');
        findButtonAndClick('button2');
        checkTextInTerminal('text2');
        findButtonAndClick('button3');
        checkTextInTerminal('text3');
        findButtonAndClick('button4');
        checkTextInTerminal('text4');
    }
}
Note:
This concept is not required because you could also add this methods to your PO directly or call the single PO methods in the testcase. But in case you have large pages you wanna test, may it is a good decision to move this methods to a utils file. Additionally the readability of the PO and the testcase file is much higher as when you combine this methods directly with the PO file.
Testcase
The structure of this folder depends on your project size and architecture. If you want to create multiple files per component it is useful to have a clear structure. Create a subfolder per feature or component to test. In our case we will only create one file in a flat structure.
// integration/sample.spec.ts
import { Common } from '../shared/common';
import { SamplePo } from '../support/po/sample.po';
import { SampleUtil } from '../support/util/sample.util';

describe('Angular Welcome Board', () => {
    before(() => {
        Common.open();
    });

    beforeEach(() => {
        // may load testdata here
    });

    it('able to click buttons', () => {
        SamplePo.findButtonAndClick('Angular Material');
        SamplePo.checkTextInTerminal('ng add @angular/material');

        SamplePo.findButtonAndClick('Run and Watch Tests');
        SamplePo.checkTextInTerminal('ng test');
    });

    it('click buttons and check terminal', () => {
        SampleUtil.clickAllPossibleButtonsAndCheckTerminal();
    });
});
What you can now see is, that we moved all the fixtures/selector information away from the real test source, so you are left with a human readable test.
Also for less technical people it is possible to understand what happens here and it should be possible to add a new test without any Cypress framework knowhow.
Note:
- Do not call the framework directly
- Represent user flows or use-cases
- Use meaningful methods names
Test data (or Fixtures)
In the Fixtures folder it would be good if the structure was similar to the Integration folder.
Possible content:
- API's mocks
- setup scripts for an environment
- test data
- media files
Cypress Fixtures Loading
Cypress has multiple ways of loading a fixtures file. These ways are documented here.
Decide for your project and for your test cases which one is best.
Conclusion
Separating the logic, selectors and actual test files reduces the amount of work necessary to keep the tests up to date during development and allows a tester to participate in the development team.
You can create a very nice wrapper to abstract the framework and add there functionality to improve the logging and debugging.
With this architecture there is less framework know how needed to write new tests or to edit them when required.
Additionally the testcase is self-documented as long you use meaningful method names and parameters.
Happy E2E-Testing 😁👍
Author

Wayne Maurer
Firmengründer, Software Architekt und Entwickler
Verbringt seine Freizeit auf dem Fahrrad und mit Laufsport.